Azure Script to Upload Operating System Image
This browser is no longer supported.
Upgrade to Microsoft Edge to take advantage of the latest features, security updates, and technical support.
Upload a generalized Windows VHD and apply information technology to create new VMs in Azure
Applies to: ✔️ Windows VMs ✔️ Flexible calibration sets
This article walks you through using PowerShell to upload a VHD of a generalized VM to Azure, create an prototype from the VHD, and create a new VM from that image. Yous tin upload a VHD exported from an on-premises virtualization tool or from another cloud. Using Managed Disks for the new VM simplifies the VM management and provides meliorate availability when the VM is placed in an availability prepare.
For a sample script, see Sample script to upload a VHD to Azure and create a new VM.
Before y'all begin
- Before uploading any VHD to Azure, yous should follow Set up a Windows VHD or VHDX to upload to Azure.
- Review Program for the migration to Managed Disks earlier starting your migration to Managed Disks.
Generalize the source VM by using Sysprep
If you lot oasis't already, you need to Sysprep the VM before uploading the VHD to Azure. Sysprep removes all your personal account information, among other things, and prepares the machine to exist used as an prototype. For details well-nigh Sysprep, come across the Sysprep Overview.
Make sure the server roles running on the auto are supported by Sysprep. For more information, see Sysprep Support for Server Roles.
Important
If you lot plan to run Sysprep earlier uploading your VHD to Azure for the first time, make sure you have prepared your VM.
-
Sign in to the Windows virtual auto.
-
Open the Control Prompt window as an administrator.
-
Delete the panther directory (C:\Windows\Panther).
-
Change the directory to %windir%\system32\sysprep, and and then run
sysprep.exe. -
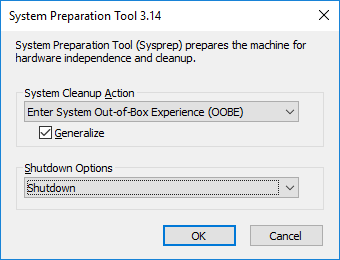
In the Organisation Training Tool dialog box, select Enter Organisation Out-of-Box Experience (OOBE), and make certain that the Generalize cheque box is enabled.
-
For Shutdown Options, select Shutdown.
-
Select OK.
-
When Sysprep finishes, it shuts downwardly the virtual machine. Exercise not restart the VM.
Upload the VHD
You can at present upload a VHD straight into a managed disk. For instructions, see Upload a VHD to Azure using Azure PowerShell.
One time the VHD is uploaded to the managed disk, y'all need to apply Get-AzDisk to go the managed deejay.
$deejay = Become-AzDisk -ResourceGroupName 'myResourceGroup' -DiskName 'myDiskName' Create the image
Create a managed image from your generalized Bone managed deejay. Replace the following values with your own information.
First, set some variables:
$location = 'East U.s.a.' $imageName = 'myImage' $rgName = 'myResourceGroup' Create the image using your managed disk.
$imageConfig = New-AzImageConfig ` -Location $location $imageConfig = Set up-AzImageOsDisk ` -Image $imageConfig ` -OsState Generalized ` -OsType Windows ` -ManagedDiskId $disk.Id Create the image.
$image = New-AzImage ` -ImageName $imageName ` -ResourceGroupName $rgName ` -Image $imageConfig Create the VM
At present that you lot have an paradigm, you can create ane or more new VMs from the image. This example creates a VM named myVM from myImage, in myResourceGroup.
New-AzVm ` -ResourceGroupName $rgName ` -Name "myVM" ` -Image $image.Id ` -Location $location ` -VirtualNetworkName "myVnet" ` -SubnetName "mySubnet" ` -SecurityGroupName "myNSG" ` -PublicIpAddressName "myPIP" Next steps
Sign in to your new virtual auto. For more data, see How to connect and log on to an Azure virtual auto running Windows.
Feedback
Submit and view feedback for
Source: https://docs.microsoft.com/en-us/azure/virtual-machines/windows/upload-generalized-managed
0 Response to "Azure Script to Upload Operating System Image"
Post a Comment